
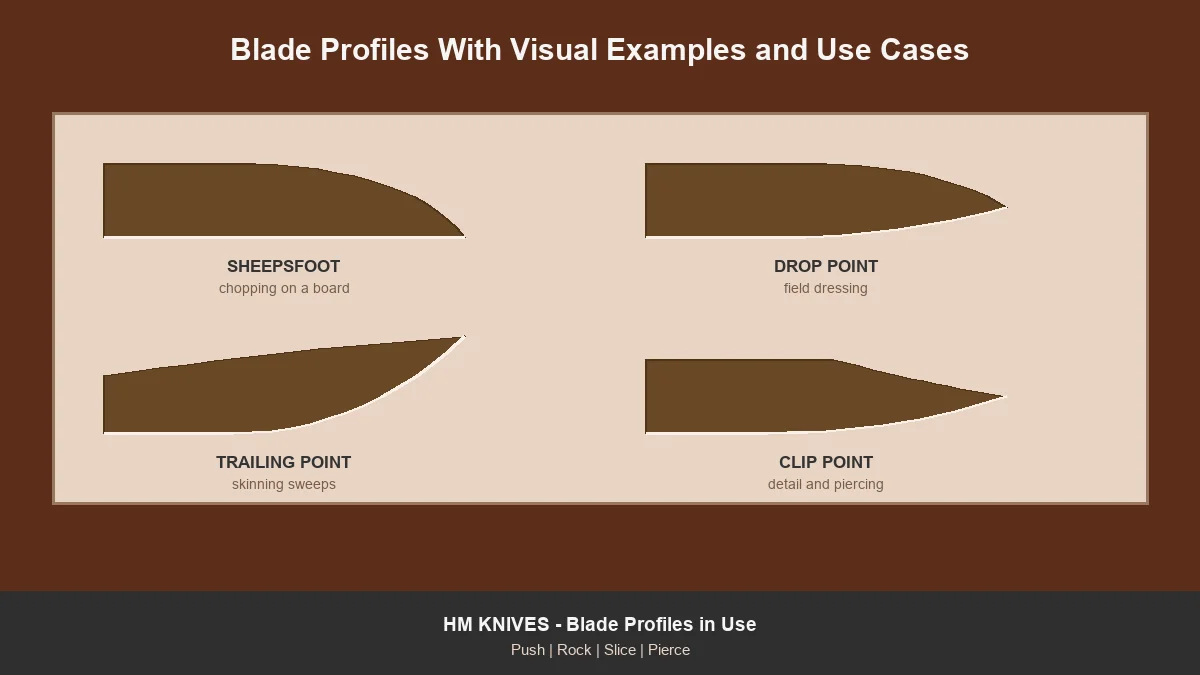
Table of Contents
- Start With the Cut, Not the Shape
- The Four Cutting Motions
- Belly: The Property That Decides Most of It
- Working on a Board
- Kitchen Tasks, Task by Task
- Field Dressing and Skinning
- Filleting and Fish Work
- Rope, Cord, Webbing and Packaging
- Carving, Feathering and Wood Work
- Everyday Cutting
- When a Point Is a Liability
- How Profile and Length Interact
- Matching a Profile to Your Actual Work
- Frequently Asked Questions
- Shape Follows Function
Start With the Cut, Not the Shape
Most blade profile guides start with the shapes and work outward to what they do. That is the wrong direction for anyone actually choosing a knife, because you do not arrive with a shape in mind. You arrive with something you need to cut.
This guide runs the other way. It starts with the motion your hand makes and the material in front of you, then names the profile built for it. If you want the reference version organised by profile, with tip strength and piercing compared side by side, that is our companion guide to blade profiles and when to use them. This one is about matching shape to work.
The Single Most Useful Idea Here
Every profile is a compromise between belly and point. More belly means better sweeping cuts and a weaker, less precise tip. Less belly means a stronger, more controllable point and worse sweeping. Almost everything else follows from that trade.
The Four Cutting Motions
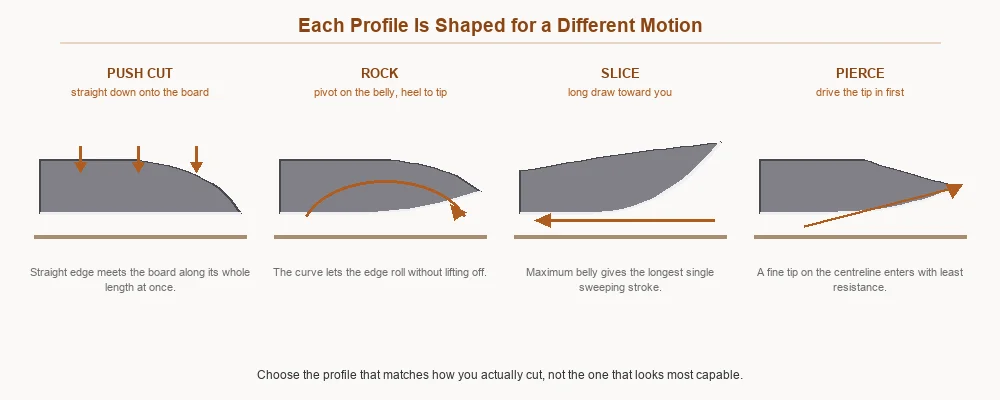
Push Cut: Straight Down
The edge descends onto the material and through it. Chopping herbs, dicing, cutting through card on a bench. Wants a straight edge that contacts along its whole length at once. Sheepsfoot and santoku shapes excel.
Rock: Pivot on the Belly
The tip stays near the board while the heel lifts and falls, rolling the edge through the material. Mincing garlic, working through a pile of parsley. Wants a moderate, even curve. The drop point and classic chef curve are built for it.
Slice: Long Draw
The blade is drawn toward you across the material, using length rather than force. Carving a roast, separating hide, filleting. Wants maximum belly so the contact point keeps moving. Trailing point shapes dominate.
Pierce: Tip First
The point enters before anything else. Starting a cut in packaging, opening a body cavity, boring a hole in leather. Wants a fine tip close to the centreline. Clip point and spear point shapes suit it.
Most Real Work Is a Blend
Which is why general-purpose profiles exist. A drop point does none of the four perfectly and all of them acceptably, which is exactly what most people need.
| Motion | What you are doing | Profile built for it | Profile to avoid |
|---|---|---|---|
| Push cut | Chopping and dicing on a board | Sheepsfoot, santoku | Trailing point |
| Rock | Mincing, working through a pile | Drop point, chef curve | Sheepsfoot |
| Slice | Long draw cuts, carving, skinning | Trailing point | Sheepsfoot |
| Pierce | Starting a cut, opening a cavity | Clip point, spear point | Sheepsfoot, gut hook |
Why Most People Use Two Motions Without Noticing
Watch anyone cut for a few minutes and you will see them switch between motions constantly without thinking about it. Dicing an onion involves a push cut through the layers, a rock to finish the last of it, and often a short slice to release a piece still attached. This is why a profile that can only do one thing well is frustrating in general use, and why the profiles that sell in the largest numbers are the ones that handle two or three motions acceptably.
The specialists earn their place when one motion dominates so heavily that everything else is incidental. A skinner is used for one motion for hours at a time; a bread knife likewise. If your work has that character, buy the specialist. If it does not, the generalist is not a compromise so much as the correct answer.
Belly: The Property That Decides Most of It
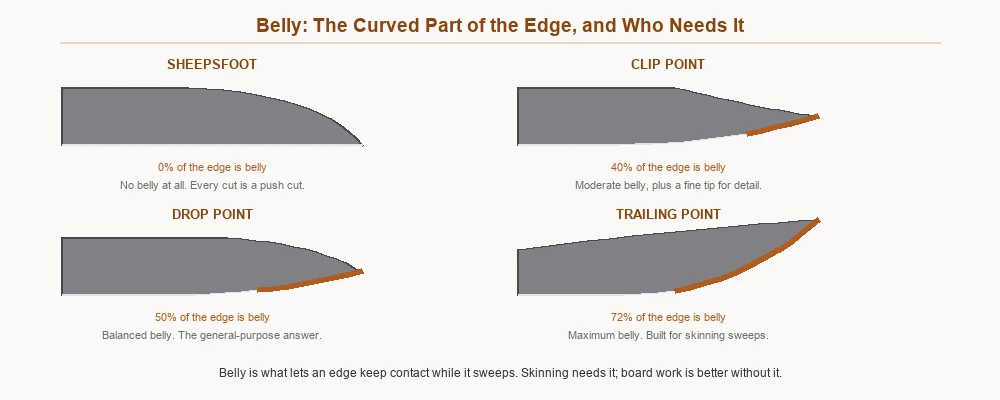
What Belly Actually Is
The curved portion of the edge running back from the tip. On a sheepsfoot it is essentially zero. On a trailing point it can be seventy percent of the whole edge.
Why It Matters for Sweeping Cuts
A curved edge keeps the contact point moving as you draw the blade, so fresh edge is constantly presented to the material. A straight edge presents the same section throughout, which works on a board and poorly on a curved surface like hide.
Why It Hurts on a Board
Curve means only part of the edge reaches the board at a time, so a heavily bellied blade leaves uncut material behind on a flat surface. This is the single most common mismatch in kitchen knives.
Reading Belly in a Photograph
Look at where the edge stops being straight. If that point sits close to the heel, the blade is heavily bellied and built for sweeping. If it sits close to the tip, the blade is built for board work.
Working on a Board
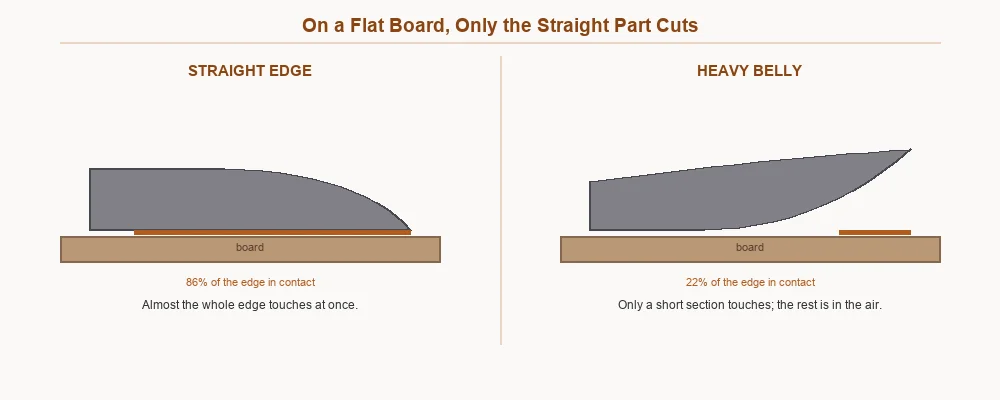
The Contact Problem
On a flat board, only the part of the edge that reaches the board actually cuts. A straight edge lands along most of its length. A heavily bellied blade touches a short section, and the rest passes above the material.
The Symptom People Misdiagnose
Slices that stay attached by a thread at the ends. Owners assume the knife is dull, sharpen it, and the problem persists because it was geometry rather than sharpness.
What to Use Instead
For board work, choose a flatter profile. A santoku or sheepsfoot lands cleanly across its length. See the kitchen and chef knives range for blades ground with board work in mind.
Grind Is a Separate Question From Profile
Profile is the outline seen from the side. Grind is the cross-section behind the edge, seen end-on, and the two are independent: any profile can carry any grind. A flat grind thins evenly from spine to edge and slices well. A hollow grind is concave and produces a very thin, keen edge that is less robust. A Scandi grind has a single wide bevel that registers flat against wood. A convex grind curves outward and is the toughest, favoured for chopping.
This matters because two knives with identical profiles can cut completely differently depending on grind, and buyers frequently attribute to profile what is actually the grind. If a blade wedges in dense material despite being sharp, look at the cross-section rather than the outline.
Kitchen Tasks, Task by Task
Dicing Onions and Vegetables
A flat-ish edge with a modest curve toward the tip. Enough flat for clean board contact, enough curve to rock through the last of a pile.
Mincing Herbs and Garlic
Rocking motion, so a pronounced even curve helps. This is the one kitchen task that genuinely rewards belly.
Carving Cooked Meat
Long draw slicing, so length matters more than curve. A long, narrow, gently curved blade cuts with fewer strokes and leaves a cleaner face.
Peeling and In-Hand Work
Short, controllable, slight curve. A paring blade around 75 to 100mm, used away from the board entirely.
Breaking Down Poultry
Piercing and precise separation at joints, so a finer tip earns its place here.
| Kitchen task | Motion | Best profile | Typical length |
|---|---|---|---|
| Dicing vegetables | Push and rock | Santoku or flat chef curve | 180-250mm |
| Mincing herbs | Rock | Pronounced even curve | 200-250mm |
| Carving roast meat | Slice | Long, narrow, gentle curve | 230-300mm |
| Peeling in the hand | Push and pare | Short spear or drop point | 75-100mm |
| Jointing poultry | Pierce and separate | Clip point or boning curve | 130-160mm |
| Slicing bread | Slice | Straight serrated | 200-250mm |
Field Dressing and Skinning
Two Different Jobs, Two Different Shapes
Field dressing needs a controllable point that will open hide without perforating what is underneath. Skinning needs belly to sweep along the separation between hide and carcass.
Why the Drop Point Dominates Field Dressing
The tip sits below the spine line, so there is steel above the point supporting it and the tip is less likely to dive where you do not want it. It handles both jobs adequately, which is why most hunters carry one.
When to Add a Skinner
If you process several animals a season, a dedicated trailing point separates hide noticeably faster. For one or two animals a year, the drop point is enough. Our guide to choosing the right hunting knife goes further into length and grind, and the hunting knives range covers both shapes.
Gut Hooks in Practice
Genuinely quick at opening hide if you have practised. Awkward to sharpen and easy to snag otherwise. Most hunters do better with a controlled drop point tip.
Why the Same Knife Struggles at Both
Field dressing wants a controllable point and moderate belly; skinning wants maximum belly and cares little about the tip. Those requirements pull in opposite directions, which is why hunters who process serious volume carry two knives rather than one excellent compromise. The drop point exists precisely because most people do not process enough game to justify the second blade, and it lands close enough to the middle to do both jobs without complaint.
If you are choosing one knife for a season, the question worth asking is how many animals. Below about three, one drop point. Above that, the time saved by a dedicated skinner starts to matter more than the cost of carrying two.
Filleting and Fish Work
Flex Matters More Than Profile
The defining property of a fillet blade is that it bends, letting the edge ride the contour of the spine rather than cutting through it. Profile is secondary to that.
The Shape That Suits
Narrow, thin, with a long gentle upsweep. Enough belly to follow a curve, enough point to start a cut behind the gill.
Why a Camp Knife Fails Here
A stiff, thick blade cannot follow bone and tears the flesh instead. This is the clearest example of profile and grind mattering more than steel. The fishing and camping knives range separates the two roles.
Recurve Blades and Why They Divide Opinion
A recurve blade has an edge that dips inward before sweeping out to the tip, producing an S-shaped profile. The concave section traps material and pulls it into the edge, which makes recurves genuinely excellent at draw cuts through rope, vine and vegetation. They are visually striking and they sell well on that basis.
The drawback appears at sharpening. A concave section cannot be maintained on a flat stone, because the stone only reaches the outer curve. Keeping a recurve sharp requires a rod, a slipstone or a shaped abrasive, and many owners discover this only after the edge dulls. If you sharpen freehand on bench stones, a recurve will quietly become the knife you stop using.
Rope, Cord, Webbing and Packaging
The Motion Is Draw, Not Push
Fibrous material parts under a drawing cut, so belly helps by keeping the contact point moving through the fibres.
Why a Coarse Edge Cuts Rope Better
A slightly toothy edge from a medium stone bites into fibre where a polished edge slides. This is one of the few cases where less refinement performs better, and our maintenance guide covers finishing an edge for the material you cut.
Packaging and Boxes
Piercing to start, then a short draw. A fine tip earns its place, and cardboard is abrasive enough that edge retention shows up quickly.
Where Edge Finish Matters More Than Shape
Cardboard deserves a specific mention because it destroys edges faster than almost anything else people cut routinely. It is loaded with clay and mineral filler, which is abrasive in a way that wood and food are not, and a blade used mainly on packaging will need sharpening several times more often than the same blade used on vegetables.
Knowing this changes what you should buy for the job. A harder steel genuinely pays off here, and a coarse working edge outlasts a polished one because there is more steel behind each point of contact. It is one of the few everyday tasks where edge retention is the property you actually notice week to week.
Carving, Feathering and Wood Work
Control Beats Length
Wood work is done with short, controlled cuts close to the hand, so a shorter blade with a straight section is easier to steer.
Why Scandi Grinds Suit It
A flat primary bevel registers against the wood and gives tactile feedback about the cutting angle, which is why bushcraft blades so often use one.
The Spine Matters Too
A squared spine scrapes tinder and throws sparks from a ferrocerium rod. A rounded one does neither, and it costs a maker nothing to leave it square.
Serrations: A Different Answer to the Same Problem
Serrations solve the fibrous material problem by another route. Each scallop concentrates force at a point and the pattern saws through rope, bread crust and webbing far longer than a plain edge, because the protected valleys stay sharp long after the exposed points have worn. For a knife that lives on rope and packaging, a serrated section is genuinely useful.
The cost is versatility and maintenance. Serrations tear rather than slice through soft material, make a mess of anything you want a clean face on, and require a tapered rod to sharpen properly. Partially serrated blades attempt a compromise and frequently deliver too little of either, leaving a plain section too short for real slicing and a serrated section too short for real sawing. Choose fully plain or fully serrated according to what you cut most.
Everyday Cutting
What Everyday Work Actually Involves
Packaging, tape, cord, zip ties, the occasional apple. Light, frequent, unpredictable.
The Profile That Handles All of It
A drop point or leaf shape between 60 and 90mm. Enough belly to draw-cut, enough point to pierce, nothing so specialised that it fails at the next task.
Where Sheepsfoot Shines
In settings where a point is a hazard or a liability: working around inflatables, upholstery, rigging, or anywhere a slip could puncture something expensive. It is also the profile least likely to alarm a bystander, which matters in some workplaces.
| What you are cutting | Dominant motion | Profile to choose | Why |
|---|---|---|---|
| Vegetables on a board | Push | Santoku or flat chef | Full edge reaches the board |
| Herbs, garlic | Rock | Even curve | Edge rolls without lifting |
| Cooked meat | Slice | Long gentle curve | Length beats force |
| Hide from carcass | Slice | Trailing point | Deep belly sweeps the separation |
| Inside a body cavity | Controlled pierce | Drop point | Tip supported, will not dive |
| Fish from bone | Slice with flex | Narrow upswept | Follows the spine |
| Rope and cord | Draw | Moderate belly, coarse edge | Teeth bite the fibre |
| Cardboard and tape | Pierce then draw | Drop point or leaf | Starts and continues the cut |
| Wood, carving | Short push | Straight section, Scandi grind | Registers flat on the work |
| Line under tension near a person | Draw | Sheepsfoot | No point to puncture with |
When a Point Is a Liability
Rescue and Marine Work
Cutting a seatbelt or a line under tension near a person is safer with no point at all. Sheepsfoot and blunt-tip profiles exist for precisely this.
Working Around Inflatables and Fabric
Boats, tents, airbeds, upholstery. A point that slips is a puncture.
Handing a Knife to Someone Inexperienced
A sheepsfoot removes the most common way a beginner hurts themselves or damages the work.
Handle Shape Changes What a Profile Can Do
Profile determines what the edge can do; the handle determines whether your hand can deliver it. A blade shaped for rocking needs a handle that clears the board so your knuckles do not strike it at the bottom of the stroke, which is why kitchen knives have the blade dropped below the handle line. A blade shaped for piercing needs a guard or a defined finger stop, because the hand slides forward under thrust and there is no recovering from that.
Buyers assess profile from photographs and handle from nothing at all, which is backwards. If you can hold a knife before buying, spend the time on the handle and trust the photograph for the profile.
How Profile and Length Interact
The Same Profile Behaves Differently at Different Lengths
A drop point at 75mm is a precise everyday blade. The same profile at 150mm is a camp knife with real chopping presence. Length changes leverage, reach and control more than most buyers expect.
Longer Blades Amplify Belly
A given curve stretched over a longer edge produces a longer sweeping stroke, which is why carving and skinning blades are long as well as curved.
Shorter Blades Favour Points
Control over the tip improves as the tip gets closer to your hand, which is why detail work happens on short blades. Our guide to the best knife type for every use case sets out sensible lengths by task, and format matters too, as covered in our comparison of folding and fixed blade knives.
A Note on Sharpening Different Profiles
Profile affects maintenance more than most guides admit. A straight edge is the easiest thing in the world to sharpen: lay it on the stone and work along it. A pronounced belly requires you to lift the handle progressively as you approach the tip, so the whole curve receives even attention, and beginners routinely under-sharpen the last inch as a result. That is why a well-used trailing point so often has a sharp middle and a dull tip.
Tanto profiles have two distinct edge sections meeting at an angle, and each must be sharpened separately as though it were its own small blade. Gut hooks need a round file or a chainsaw file. None of this is difficult, but it is worth knowing before you buy a shape that will need equipment you do not own. Our knife care tips cover the basics for each.
Matching a Profile to Your Actual Work
Write Down the Five Things You Cut Most
Not the dramatic possibilities, the actual five. For most people the list is unglamorous and points clearly at one or two profiles.
Identify the Dominant Motion
Are those cuts pushes, rocks, slices or pierces? One will dominate, and that answers the profile question.
Then Check the Surface
Board work pushes toward flatter edges. Work in the hand or against a curved surface pushes toward belly.
Buy for the Dominant Case
A profile that handles eighty percent of your work well beats one that handles everything adequately. Steel and materials come after this decision, and our knife materials guide covers those once the shape is settled.
The short version: board work wants a flat edge, sweeping cuts want belly, detail work wants a fine tip near the centreline, and safety-critical work wants no point at all. A drop point is the right answer when you genuinely do not know.
Frequently Asked Questions
What is the most useful blade profile overall?
The drop point. Its tip sits below the spine line, giving a strong controllable point, and it carries enough belly for sweeping cuts without losing board contact entirely. It is not the best shape for any single task and it is competent at nearly all of them.
Why do my slices stay attached at the ends?
Almost always blade curvature rather than dullness. A heavily bellied blade only contacts a flat board along a short section, so the ends of a cut never reach the surface. A flatter profile fixes it; more sharpening will not.
What is blade belly?
The curved portion of the edge running back from the tip. It ranges from essentially zero on a sheepsfoot to around seventy percent of the edge on a trailing point. Belly helps sweeping and slicing cuts and hurts board work.
Which profile is best for skinning?
A trailing point, because its deep belly keeps the edge sweeping along the line between hide and carcass. A drop point handles skinning adequately and is the better single choice if you also need to field dress with the same knife.
Is a tanto profile good for everyday use?
Only for specific work. The tanto has a very strong tip and almost no belly, so it excels at piercing hard material and performs poorly at slicing anything. For general everyday cutting a drop point or leaf shape is more useful.
Does blade profile matter more than steel?
For suitability to a task, yes. A correctly shaped blade in ordinary steel will outperform a premium steel in the wrong shape, because shape determines whether the edge can reach the material properly at all.
Shape Follows Function
Blade profiles are not a matter of taste, or not only that. Each shape is a solved problem: someone needed to skin an animal, or dice on a board, or cut a line under tension without puncturing what was behind it, and the shape is the answer they arrived at.
Work backwards from your own problem and the choice becomes straightforward. Identify what you cut, notice which motion your hand makes, check whether you work on a board or in the hand, and pick the profile shaped for that. If your work is genuinely varied, a drop point is the honest default rather than a compromise you should feel bad about.
Every profile discussed here is represented in the HM Knives collection, and if you describe the five things you cut most often, we will tell you which shape suits them, including when the one you already own is fine.

From Our Workshop
A blade built for each cutting motion. Prices are on each listing.
- Bone Handle Chef Knife — Damascus Steel, 11 Inches — rock and push cutting — a chef knife with belly at the front and a flat heel.
- Meat Chopper Knife — D2 Steel, Full Tang — chopping — a meat chopper, where mass does the work.
- Damascus Skinner Knife — Heavier 4mm Blade, Bone Handle — sweeping cuts — a deep skinner belly that keeps contact.
Browse all kitchen knives.