
Table of Contents
- What Actually Happens in the Forge
- Damascus Is a Process, Not a Material
- Choosing the Two Steels
- Stacking and Preparing the Billet
- The Forge Weld: The Step That Fails
- Drawing Out and Folding
- How Different Patterns Are Made
- Forging the Blade Shape
- Normalising: The Stage Nobody Photographs
- Hardening and Tempering
- Grinding the Bevels
- Etching: Revealing the Pattern
- What Goes Wrong, and How to Spot It
- How Long It Takes and Why That Is the Price
- Frequently Asked Questions
- Why the Process Matters to a Buyer
What Actually Happens in the Forge
Damascus is described more often than it is explained. Descriptions tend toward the romantic: ancient secrets, lost arts, mystical properties. The reality is a specific sequence of physical operations, each of which can be done well or badly, and understanding it tells you far more about what you are buying than any amount of heritage language.
This guide walks through the whole process as it is actually done: which steels, why those two, what happens at each heat, where billets fail, and which stage decides how the finished knife will cut. It is written for buyers rather than smiths, but nothing here is dumbed down.
The One-Sentence Version
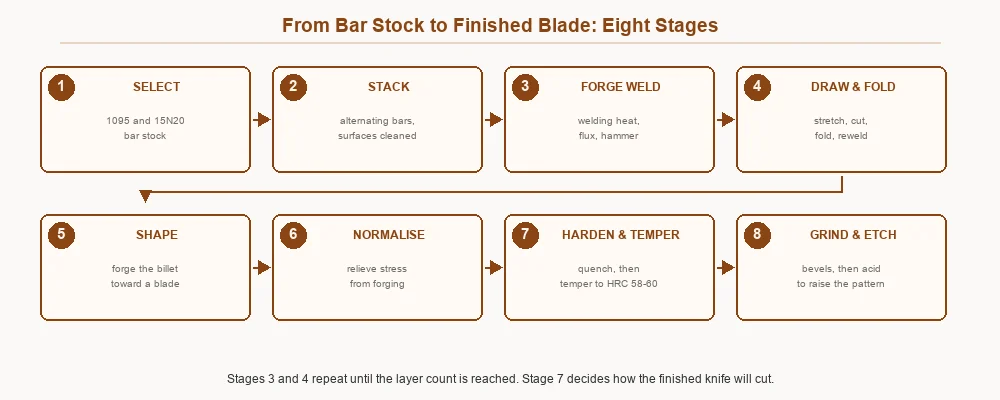
Two carbon steels are stacked, welded together at forge heat, stretched and folded until they hold hundreds of layers, forged to shape, hardened, ground and etched in acid so the boundary between the steels becomes visible.
Damascus Is a Process, Not a Material
The Distinction That Clears Up Most Confusion
You cannot buy Damascus the way you buy 1095 or 440C. There is no Damascus alloy with a composition. Damascus describes what was done to two or more ordinary steels, which means the properties of the result come entirely from those steels and their heat treatment.
What This Means Practically
A Damascus blade performs like its constituent steels. If those are carbon steels, the blade rusts. If they are hardened to HRC 58 to 60, it cuts like a carbon blade at HRC 58 to 60. There is no separate Damascus performance.
Historical Wootz Was Something Else
The original Damascus of the medieval Middle East was a crucible steel whose banding came from carbide segregation during slow cooling, not from folding. That process was genuinely lost. Modern pattern welding reaches a similar appearance by a completely different route.
Worth stating plainly: our Damascus is forged from 1095 and 1043/15N20, both carbon steels with no meaningful chromium. It is not stainless and it will rust if neglected. Full detail is in our Damascus versus high carbon steel comparison.
Choosing the Two Steels
The Constraint That Rules Out Most Pairings
Two steels welded into one blade must harden at compatible temperatures and expand and contract at similar rates during quenching. Get this wrong and the billet tears itself apart, either at the weld lines or as a warped, cracked blade.
Why 1095 and 15N20
They satisfy the compatibility constraint and differ in exactly the way that matters visually. 1095 carries about 0.95 percent carbon and does the work at the edge. 15N20 carries roughly two percent nickel, and that nickel resists the acid etch, so those layers stay bright while the 1095 darkens.
What the Nickel Does Not Do
It does not make the steel stainless. Two percent nickel is nowhere near the eleven percent chromium threshold for corrosion resistance, and a 15N20 layer left wet will rust like any other carbon steel.
Preparing the Stock
Bars are cut to matched length, and every mating face is ground clean. Mill scale, rust or oil trapped between bars becomes a permanent flaw. This stage looks like housekeeping and is actually critical.
Stacking and Preparing the Billet
How Many Bars to Start
Typically seven to eleven, alternating between the two steels. An odd number puts the same steel on both outside faces, which keeps the finished pattern symmetrical.
Tacking the Stack
The bars are tack welded at one end and a handle rod attached, so the stack can be manipulated in the fire as one object rather than a loose pile.
Flux and Why It Is Used
Borax is applied as the billet heats. It melts into a glassy layer that floats oxide out of the joints and stops fresh oxide forming. Without it, oxygen reaches the mating faces and the weld fails.
| Stage | What happens | Rough time | What it decides |
|---|---|---|---|
| Select and prepare | Cut and clean 1095 and 15N20 bars | 30 min | Whether the weld can take at all |
| Stack and tack | Alternate bars, tack weld, attach handle | 20 min | Pattern symmetry |
| Forge weld | Flux, bring to welding heat, hammer | 1-2 hrs | Whether the billet survives |
| Draw and fold | Stretch, cut, fold, reweld, repeat | 3-4 hrs | Layer count and pattern |
| Forge to shape | Move steel toward the blade profile | 1-2 hrs | Distal taper and balance |
| Normalise | Heat and air cool, two or three cycles | 1 hr | Grain structure and warp resistance |
| Harden and temper | Austenitise, quench, temper twice | 4 hrs | How the finished knife cuts |
| Grind and etch | Bevels, then ferric chloride | 2-3 hrs | Edge thickness and visible pattern |
The Forge Weld: The Step That Fails
The Temperature Window
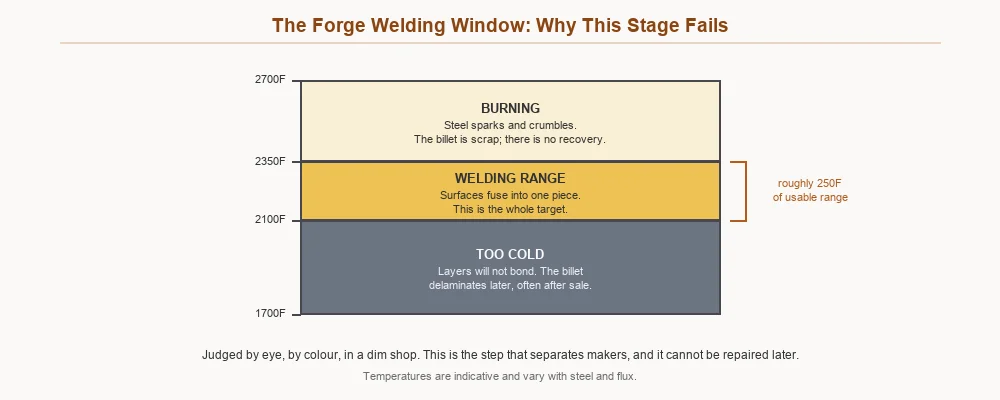
Forge welding happens in a band of roughly 250 degrees Fahrenheit. Below it the layers will not bond. Above it the steel begins to burn, sparking and crumbling, and the billet is scrap.
Judged by Eye
Most smiths judge this by colour in a deliberately dim shop, because a thermometer cannot be inside the fire with the steel. That is why forge welding is the skill that most separates makers, and why it takes years rather than weeks to become reliable at it.
The Weld Itself
At welding heat the billet is brought to the anvil and struck, starting at one end and working along so trapped flux and oxide are driven out ahead of the weld rather than sealed inside.
No Second Chances
A failed weld cannot be repaired later. It becomes a cold shut, an unbonded seam inside the steel, which will show as a fine dark line and eventually open as a crack.
Reading Colour Instead of Numbers
Because the work is judged by eye, smiths learn a colour vocabulary that maps roughly onto temperature. A dull red is far too cool for welding. Cherry red is the range for forging shape but not for welding. Bright orange approaches the bottom of the welding window, and a yellow verging on white is where the weld takes. Beyond that the surface begins to throw sparks, which is the steel itself burning.
Shop lighting is kept deliberately low for exactly this reason. A billet that looks correctly yellow in a dim workshop will look washed out in daylight, and a smith working in bright light will consistently overheat their steel. This is one of the small practical details that separates a working forge from a photogenic one.
Drawing Out and Folding
The Arithmetic
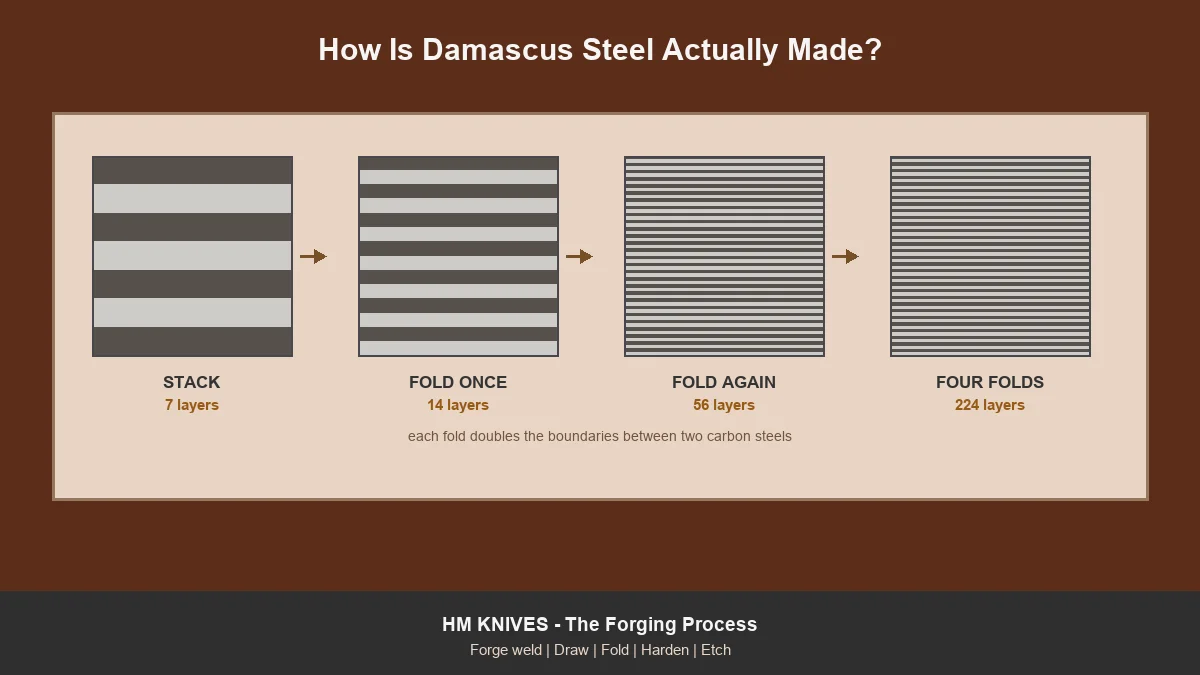
Each fold doubles the layer count. Seven becomes fourteen, then twenty-eight, fifty-six, one hundred and twelve, two hundred and twenty-four. Four or five folds from a seven-bar stack is enough for a well-defined pattern.
Drawing Out
The welded billet is forged longer and thinner, which stretches the layers. It is then cut most of the way through, folded back on itself, and welded again.
Every Fold Is Another Chance to Fail
Each fold repeats the welding step, with all its risk. This is why layer count correlates with labour and price rather than with performance.
When to Stop
Past roughly three hundred layers the individual bands become finer than the eye resolves at arm’s length, so additional folds add cost and risk without adding visible detail.
How Different Patterns Are Made
Random or Ladder
A plain drawn billet gives a flowing random pattern. Cutting grooves across the billet and forging them flat produces the ladder pattern.
Twist
The billet is heated and twisted along its length before being forged flat, which produces the rope-like spiral pattern.
Raindrop and Dimple
Depressions are drilled or punched into the billet surface and then forged flat, exposing lower layers as concentric rings.
The Pattern Is Decided Before the Blade Exists
All of this happens at billet stage. Once the blade is ground, the pattern is whatever the billet manipulation produced.
| Pattern | How it is made | Relative difficulty | What it costs |
|---|---|---|---|
| Random | Plain drawn and folded billet | Baseline | Standard |
| Ladder | Grooves cut across the billet, forged flat | Moderate | Modest premium |
| Twist | Billet twisted hot, then forged flat | High | Noticeable premium |
| Raindrop | Dimples punched or drilled, then flattened | High | Noticeable premium |
| Mosaic | Pre-arranged billet elements welded together | Very high | Large premium |
Why Layer Count Alone Tells You Little
Because folding is arithmetic, a high layer count is easy to advertise and easy to reach: three extra folds turn 56 layers into 448 without any change in skill. What it does not tell you is whether each of those welds took cleanly. A 120-layer billet welded flawlessly is a better blade than a 500-layer billet carrying two cold shuts, and the higher number is the one that appears in the listing.
Judge instead on the continuity of the pattern in raking light, on whether the maker will state a finished hardness, and on whether the plunge lines match. Those tell you about execution, which is what actually varies. Our comparison of handmade and production knives covers how to read the difference.
Forging the Blade Shape
Forging Versus Stock Removal
The billet is forged toward the blade profile rather than simply cut out of it. Forging moves steel instead of removing it, which keeps the layer pattern flowing with the shape rather than cutting across it.
Distal Taper
The blade is forged thinner toward the tip. This is where a maker paying attention produces a knife that feels alive in the hand rather than nose-heavy, and it is one of the genuine advantages of hand work discussed in our comparison of handmade and production knives.
Leaving Material for Grinding
The forged blade is deliberately left thicker than final dimensions, because grinding will remove the decarburised outer skin that forging creates.
Pattern Placement on the Finished Blade
Where the pattern sits is decided by how the blade is drawn out of the billet, and a maker thinking ahead will orient the billet so the most striking part of the pattern lands on the flats where it will be seen rather than being ground away in the bevels. On a deep hollow grind a surprising amount of the billet’s surface disappears, and with it the pattern that was on it.
This is one reason the same billet can produce blades that look quite different, and why two knives cut from adjacent sections may not match. It also explains why the pattern often runs differently near the edge than along the spine: the grind has cut down through the layers at an angle, exposing them in section rather than in plan. The effect is most visible on the blade profiles with the most dramatic curvature.
Normalising: The Stage Nobody Photographs
What It Does
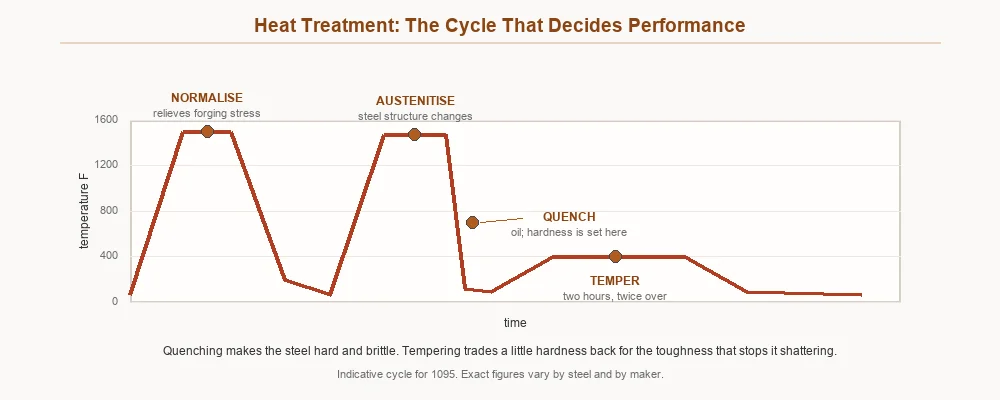
Forging leaves the steel’s grain structure stressed and uneven. Normalising means heating above critical temperature and cooling in still air, usually two or three times, each time from a slightly lower temperature.
Why Skipping It Shows Up Later
An unnormalised blade is more likely to warp or crack during quenching, and finishes with a coarser grain that chips more readily. It adds an hour and no visible benefit, which is exactly why it gets skipped on cheap work.
Hardening and Tempering
Austenitising
The blade is heated to around 1475F and held until the steel’s structure has fully converted. Too short and the transformation is incomplete; too long and the grain coarsens.
The Quench
The blade goes into oil. Hardness is set in about two seconds. Quench too slowly and the blade stays soft; too aggressively and it cracks. This is the moment hours of work are either banked or lost.
Tempering
Straight from the quench the blade is glass-hard and brittle enough to shatter. Tempering, typically two hours at around 400F, done twice, trades a little hardness back for the toughness that stops it breaking. Our blades finish at HRC 58 to 60.
Why This Stage Decides the Knife
The same steel treated two ways produces two entirely different knives, and no buyer can tell by looking. This is why we publish a hardness range, and why our guide to knife steel types treats heat treatment as the primary variable.
Grain Size and Why Two Blades Differ
Steel is made of crystalline grains, and their size is set during heat treatment. Fine grain gives a tougher blade that takes a keener edge; coarse grain chips more readily and will not refine to the same apex. Grain coarsens when steel is held above critical temperature for too long, which is exactly what happens in a rushed shop where blades sit in the forge waiting.
None of this is visible on a finished knife, which is why it is so easy to skip and so consequential when it is. It is also why normalising cycles matter: each one refines the grain a little further before the final hardening locks it in. A maker who normalises three times is buying toughness that a photograph will never show.
Grinding the Bevels
Removing the Skin
Forging leaves a decarburised outer layer, lower in carbon and softer than the steel beneath. Grinding removes it, which is why the blade was left oversize.
Where Cutting Performance Is Decided
Thickness behind the edge is set here, and it predicts how a knife cuts better than any other single measurement. A blade left thick will feel blunt even when sharp.
Keeping the Steel Cool
Grinding generates heat, and heat above roughly 400F undoes the tempering at the edge. Careful makers dip the blade constantly. This is a common shortcut on rushed work and is invisible until the edge fails early.
Etching: Revealing the Pattern
Before the Acid, the Blade Looks Plain
Ground and polished, both steels take a similar finish and the layers barely register.
What the Acid Does
Ferric chloride attacks the 1095 faster than the nickel-bearing 15N20. The 1095 darkens and sits fractionally lower; the 15N20 stays bright and stands slightly proud. That difference in colour and height is the pattern.
Neutralising
The blade is neutralised, usually in a baking soda solution, then oiled. Skipping this leaves acid working on the steel after it leaves the shop.
The Pattern Goes All the Way Through
Layers run through the full thickness, so sharpening never removes the pattern. The surface etch can fade over years and a light re-etch restores it, as covered in our maintenance guide.
Fitting the Handle
With the blade finished, the tang is drilled for pins and the scales are shaped, fitted and pinned. On handmade work the scales are fitted to that specific tang rather than to a standard, which is why the joint on a good knife has no gap a fingernail can catch. Peened pins spread on both ends and hold mechanically; epoxy alone relies on adhesive and is the weaker arrangement over decades.
The handle material is chosen at this stage, and the choice is genuinely functional rather than only decorative. Micarta and G10 grip better wet and ignore humidity; stag, bone and wood look better and want more care. Our knife materials guide sets out the trade-offs, and the same blade is often offered with several handle options for exactly this reason.
What Goes Wrong, and How to Spot It
| Failure | Stage it happens | How it looks | Recoverable? |
|---|---|---|---|
| Cold shut | Forge weld | Fine dark line following the layers, often near the spine | No |
| Delamination | Weld or quench | Hairline gap at the plunge or along the edge | No |
| Burnt steel | Forge weld | Sparking at heat; crumbly, coarse surface | No |
| Carbon migration | Excessive time at heat | Pattern contrast looks washed out | No, but usually cosmetic |
| Quench crack | Hardening | Fine crack, often from the plunge line | No |
| Warp | Hardening | Visible bend sighting down the spine | Sometimes |
| Overheated grind | Grinding | Edge chips or rolls unusually early | Only by regrinding |
How to Inspect Before Buying
Look along the flats in raking light. The pattern should be continuous and the layer lines unbroken. Any line crossing the pattern rather than following it is a question for the seller. Sight down the spine for straightness, and check that the plunge lines match on both sides.
Straightening and Final Checks
Blades frequently come out of the quench with a slight bend, because the two steels contract at marginally different rates and the blade cools unevenly along its length. A small warp can be corrected while the blade is still warm from tempering, clamped straight between blocks and taken through a second temper cycle so the steel relaxes in the corrected position.
A larger warp is a different matter. Attempting to bend fully hardened steel cold is how blades snap, and a maker who tries it is gambling with several days of work. The honest response to a badly warped blade is to scrap it, which is part of why the scrap rate matters to the price. Before a knife leaves the shop it is sighted down the spine, checked for straightness in both planes, and tested for hardness, and any blade that fails is not sold at a discount.
How Long It Takes and Why That Is the Price
The Hours
Six to eight hours of skilled work before the billet becomes a blade at all, then shaping, normalising, heat treatment, grinding, handle fitting and etching on top.
The Scrap Rate
Billets fail. A maker who loses one in six is doing well, and the cost of the failures is carried by the ones that succeed.
What You Are Not Paying For
Exotic material. 1095 and 15N20 are inexpensive, ordinary steels. The premium is labour and risk, which is set out further in our guide on where to spend your money on knives and in the knife materials comparison.
What the Process Cannot Give You
It is worth closing the loop on what all this work does not achieve, because the forging process is frequently invoked to justify claims it cannot support. Folding does not add carbon, remove impurities in any meaningful modern sense, or transform ordinary steel into something exotic. Nineteenth-century smiths folded partly to homogenise inconsistent bloomery iron; modern bar stock arrives clean and uniform, so that original purpose has gone entirely.
Nor does the process confer corrosion resistance, hardness beyond what the constituent steels allow, or an edge that holds longer than a single-steel blade of the same alloys and heat treatment. What it produces is a visible record of how the blade was made, and a modest toughness benefit at the layer boundaries. Anyone claiming more is selling the romance rather than the steel, and our use case guide is a better starting point if performance is your priority.
Frequently Asked Questions
How long does it take to make a Damascus blade?
Six to eight hours of forge work to produce the billet, before any shaping begins. Adding forging to shape, normalising, hardening, tempering, grinding, handle fitting and etching, a finished knife typically represents one to two full days of skilled work.
How many times is Damascus folded?
Usually four or five times from a starting stack of seven to eleven bars, giving between about 112 and 350 layers. Each fold doubles the count. More folds add labour and risk without improving how the knife cuts.
Why does Damascus need to be etched?
Because the two steels polish to nearly the same colour, so the layers are almost invisible on a finished blade. Acid attacks the 1095 faster than the nickel-bearing 15N20, darkening one and leaving the other bright. That contrast is the pattern.
Can Damascus be made from stainless steel?
Yes, but it is a different and more expensive product requiring stainless constituent steels and usually vacuum or foil-wrapped heat treatment. HM Knives Damascus is carbon steel, specifically 1095 and 1043/15N20, and it will rust if neglected.
What is a cold shut?
An unbonded seam left where a forge weld did not take, usually because the steel was too cool or oxide was trapped between layers. It shows as a fine dark line following the layers and is a crack waiting to open. It cannot be repaired.
Does the folding make the steel stronger?
Only marginally. Folding multiplies the boundaries between two steels, which can deflect a propagating crack and gives a small toughness benefit under lateral shock. It does not increase hardness or edge retention, and the effect is far smaller than the difference good heat treatment makes.
Why Small Shops Charge What They Do
A working smith producing a few hundred blades a year cannot spread fixed costs the way a factory can, and every hour in the sequence above is an hour not spent on another knife. A failed billet at stage three costs the same in time as one that succeeds, and that loss has to be recovered somewhere.
This is why handmade Damascus sits where it does on price, and why the cheapest Damascus on the market is almost always imported billet finished elsewhere rather than forged from bar stock by the seller. Neither arrangement is dishonest, but they are different products at different costs, and the listing rarely distinguishes them. If price is the deciding factor, our guide comparing hunting knives across the range and our notes on where to spend your money will help you place a given knife.
Why the Process Matters to a Buyer
Knowing how Damascus is made changes what you ask about it. Instead of layer counts and heritage language, you can ask which two steels, what hardness the blade finishes at, and whether it is stainless. Those three answers tell you how the knife will perform and how it must be cared for.
It also reframes the price. The premium on a Damascus blade is hours of skilled work and the billets that failed along the way, not rare material. Whether that is worth paying is a question about what you value, and it is a fair question either way.
Every Damascus blade in the HM Knives collection goes through the sequence above, and every one of them is carbon steel that wants drying and oiling. If you want to know exactly what went into a specific knife, contact us and we will tell you the steels, the layer count and the finished hardness. Our knife care tips cover keeping the pattern and the edge in good order once it is yours.
From Our Workshop
Billets from this process, finished. Prices are on each listing.
- 13 Inch Bowie Knife — Damascus Steel, Bone and Bull Horn Handle — a standard etched pattern, light and dark bands from 1095 and 15N20.
- All-Black Damascus Skinner Knife — Matching Sheath and Handle — all black finish — the same billet, etched and coated differently.
- Pink Damascus Knife — Handmade Skinner with Brass-Guarded Resin Handle — a coloured treatment over the same construction.
Browse the full range.
Pingback: 10 Damascus Patterns Makers and Buyers Must Know, and How They're Made