
Table of Contents
- Sharpening Is a Skill, Not a Gadget
- Does It Actually Need Sharpening?
- Try Honing First
- Choosing a Sharpening Method
- What You Actually Need to Buy
- Finding and Holding the Angle
- The Burr: The Skill That Decides Everything
- Sharpening on a Whetstone, Step by Step
- Working Through the Grits
- Stropping and Finishing
- Checking Your Work
- Mistakes That Keep Knives Dull
- Serrated, Recurve, Damascus and Tanto
- How Often to Sharpen
- Frequently Asked Questions
- The Twenty Minutes That Changes Everything
Sharpening Is a Skill, Not a Gadget
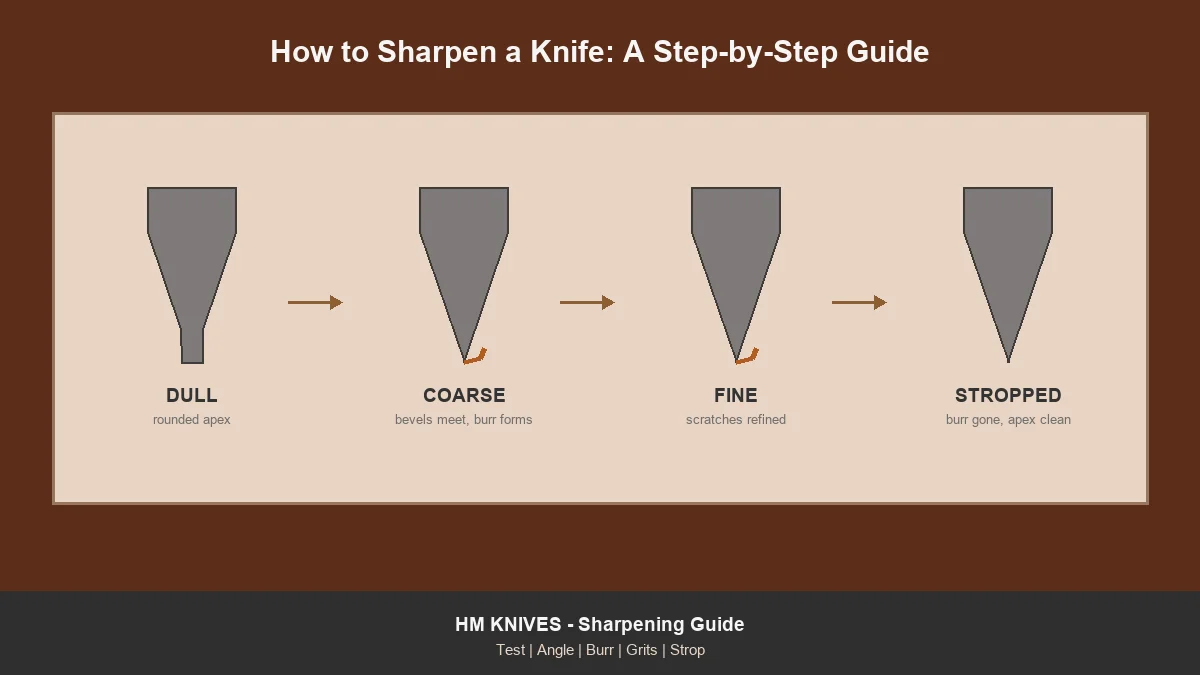
Most people who think they cannot sharpen a knife have never been told the one thing that makes it work: you are not polishing the edge, you are grinding two bevels until they meet. Until they meet, nothing you do will make the knife sharp, no matter how expensive the stone or how long you spend.
The signal that they have met is a burr, a thin wire of steel that folds over to the far side of the edge. Learn to feel for it and sharpening stops being mysterious. Everything else in this guide is detail around that one idea.
What This Guide Covers
How to tell whether the knife needs sharpening at all, how to choose a method that suits you, how to find and hold the angle, how to raise and remove a burr, and how to check you have actually succeeded. For storage, rust prevention and the wider care routine, see our complete knife maintenance guide.
How Long It Takes to Learn
Ten to fifteen sessions to become genuinely competent freehand. The skill then transfers to every knife you will ever own, which is why it is the highest-return hour in the entire hobby.
Does It Actually Need Sharpening?
Look for Light on the Edge
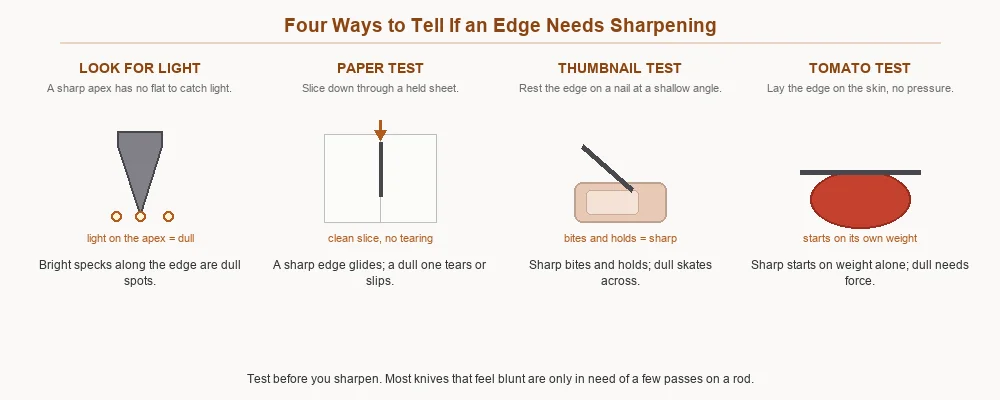
Hold the blade under a bright light and look straight down at the edge. A truly sharp apex has no flat surface to catch light, so it disappears. Any bright specks or lines you can see are flat spots, and those are the dull sections.
The Paper Test
Hold a sheet of paper by one corner and slice downward through it. A sharp knife glides and leaves a clean cut. A dull one tears, snags or skates off the edge of the sheet.
The Thumbnail Test
Rest the edge on your thumbnail at a shallow angle with no pressure. A sharp edge bites and stays put. A dull one slides across. It tells you nothing about the edge if you press, so do not.
The Tomato Test
Lay the edge on tomato skin and draw it back with no downward pressure. A sharp knife starts the cut on its own weight. A dull one skids across the skin until you push, which is exactly when knives slip.
The Onion Test
Dice an onion and watch the last few slices. If they stay attached at the ends, the edge is either dull or the wrong shape for board work, a distinction our guide to blade profiles in use explains.
Try Honing First
Most Dull Knives Are Not Dull
They are misaligned. Use bends the very apex out of line, and the blade stops cutting even though no metal has been lost. A honing rod pushes it back straight in thirty seconds.
How to Tell the Difference
Hone the knife and retest. If performance returns, it needed realigning rather than sharpening. If it does not, the edge is genuinely worn and needs abrasion.
Why This Matters
Every sharpening removes metal permanently. Honing removes none. A knife honed regularly needs sharpening perhaps twice a year instead of monthly, which extends its life by years.
Choosing a Sharpening Method
Pull-Through Carbide Sharpeners
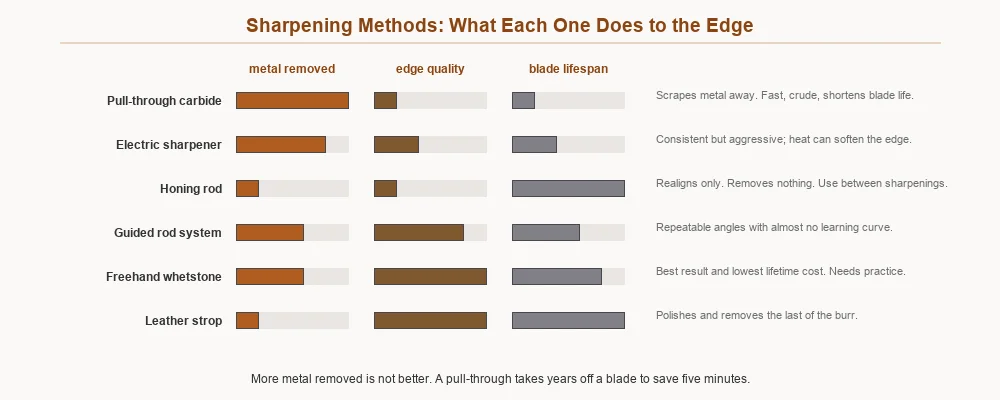
Two carbide plates that scrape metal away as you drag the blade through. They produce a working edge in seconds and remove a startling amount of steel doing it. Acceptable for a knife you do not care about; genuinely destructive on one you do.
Electric Sharpeners
Motorised abrasive wheels. Consistent and fast, and the heat generated can soften the edge if you linger. Better than a pull-through, still aggressive.
Guided Rod Systems
A clamp holds the blade and a rod holds the stone at a set angle. Repeatable results with almost no learning curve. The honest recommendation for most people who want good edges without practising.
Freehand Whetstones
The best result, the lowest lifetime cost, and the only method that teaches you anything. Needs practice, which is the entire objection to it.
Leather Strops
Not sharpening. A strop removes the last of the burr and aligns the apex, taking an already-sharp edge to keener still.
| Method | Metal removed | Edge quality | Learning curve | Best for |
|---|---|---|---|---|
| Pull-through carbide | Very high | Poor | None | Knives you do not value |
| Electric sharpener | High | Fair | None | Volume, speed over quality |
| Honing rod | None | Realigns only | Low | Between sharpenings, weekly |
| Guided rod system | Moderate | Very good | Low | Most people, most of the time |
| Freehand whetstone | Moderate | Excellent | Moderate | Anyone willing to practise |
| Leather strop | Negligible | Refines | Low | Finishing after sharpening |
Why the Method You Enjoy Beats the Method That Scores Highest
There is a strong case for the guided system that rarely gets made honestly. Freehand produces the best edge in expert hands, but a guided system used every month beats a whetstone that intimidates you into leaving knives dull for a year. The best sharpening method is the one you will actually pick up.
If you know you enjoy learning manual skills, buy stones. If you know you want sharp knives without a new hobby, buy a guided system without embarrassment. Both routes end with knives that cut, which is the only outcome that matters.
What You Actually Need to Buy
The Minimum That Works
One combination whetstone, roughly 1000 grit on one side and 6000 on the other, and a leather strop. That is around $60 to $90 and it will sharpen every knife you own for the rest of your life.
What to Add Later
A coarse stone around 400 grit for repairing chips and thinning thick factory edges. A flattening plate, because stones dish with use and a dished stone cannot produce a straight edge.
What You Do Not Need
A full progression of eight stones, a diamond plate for every grit, or a $400 guided system. These are pleasant to own and change nothing about the outcome for a beginner.
Matching Abrasive to Steel
Ordinary aluminium oxide stones handle carbon steels and softer stainless comfortably. They struggle with D2 and cannot cut powder metallurgy steels at all, which need diamond. Our guide to knife steel types covers which is which.
Steel Changes How the Stone Behaves
Two knives sharpened identically can feel completely different on the stone, and the reason is the steel rather than your technique. Softer stainless such as AUS-8 raises a burr almost immediately and can raise a stubborn one that folds back and forth rather than breaking off. Harder carbon steels like the 1095 we forge cut cleanly and release the burr readily, which is one reason they are pleasant to learn on.
If you are sharpening a mixed drawer of kitchen and chef knives you will notice this immediately: the cheap stainless one takes longer to finish properly than the good carbon one, despite being softer. Our comparison of stainless and carbon steel explains why the two families behave so differently under an abrasive.
Finding and Holding the Angle
The Angles That Matter
Kitchen knives take 15 to 18 degrees per side. Hunting and general field knives take 20 to 22. Camp and chopping blades take 22 to 25. Sharper angles cut better and chip more readily.
How to Find the Existing Angle
Colour the bevel with a marker pen, take two light passes on the stone, and look. If the marker is removed at the shoulder only, your angle is too low. At the apex only, too high. Evenly across, you have matched it.
Holding It Consistently
Consistency matters far more than the exact number. An edge sharpened at a consistent 19 degrees beats one wandering between 15 and 25. Lock your wrist, move from the shoulder, and keep your grip identical stroke to stroke.
The Cheap Aids That Help
Angle guides that clip to the spine cost around $10. A folded matchbook under the spine gives roughly 15 degrees on a standard stone. Both are legitimate ways to build muscle memory.
| Knife type | Angle per side | Included angle | Why |
|---|---|---|---|
| Fillet and paring | 12-15° | 24-30° | Maximum keenness, low impact |
| Kitchen chef’s knife | 15-18° | 30-36° | Slices cleanly on a board |
| Everyday carry folder | 18-20° | 36-40° | Balanced for mixed tasks |
| Hunting and skinning | 20-22° | 40-44° | Survives contact with bone |
| Camp and bushcraft | 22-25° | 44-50° | Tolerates batoning and knots |
| Bowie and chopping | 25-30° | 50-60° | Impact resistance above all |
Why Thinning Matters More Than Sharpening
Some knives cannot be made to cut well no matter how carefully you sharpen them, because the problem is thickness behind the edge rather than the edge itself. A blade that is 0.8mm thick just above the apex has to shoulder material aside as it passes through, and a perfect apex on top of that geometry still wedges.
The fix is thinning: working the whole primary bevel on a coarse stone to reduce that thickness, rather than just the edge bevel. It takes an hour or two the first time and transforms an otherwise disappointing knife. If a knife has always felt like hard work despite being freshly sharpened, this is almost certainly why, and our guide on where knife money actually goes covers why factory edges are left thick in the first place.
The Burr: The Skill That Decides Everything
What a Burr Is
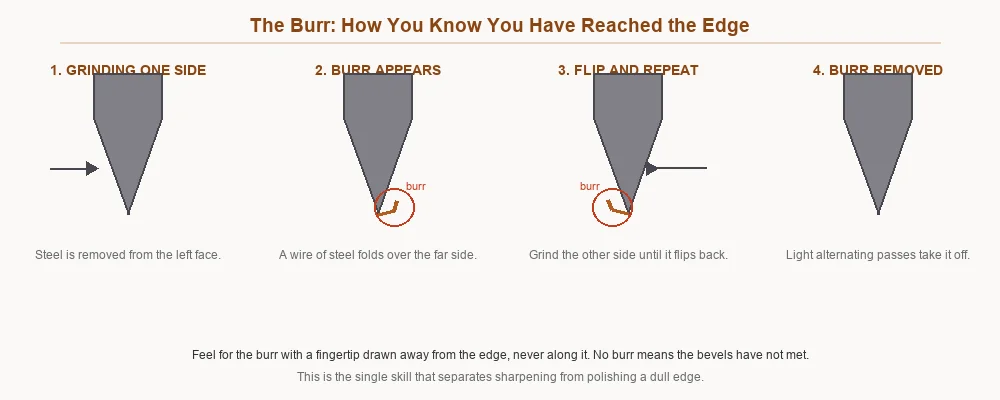
As you grind one bevel, steel is pushed toward the apex. When the bevel finally reaches the very edge, that steel has nowhere to go and folds over to the opposite side as a fine wire. That wire is the burr.
Why It Is the Only Reliable Signal
A burr along the whole length proves the bevel has reached the apex along the whole length. Without one, you have been polishing the shoulder of a dull edge, which is exactly what most unsuccessful sharpening consists of.
How to Feel for It
Draw a fingertip from the spine down and off the edge, never along it. The burr catches slightly on one side and feels smooth on the other. Check at the heel, the middle and the tip: a burr at the middle only means the ends are not done.
Flipping It
Once the burr runs the full length, switch sides and grind until it flips to the other side. Now both bevels have reached the apex.
Removing It
Alternate single light passes on each side, reducing pressure each time, then strop. A burr left on the knife feels sharp for about a minute and then tears off in use, leaving a ragged edge.
Sharpening on a Whetstone, Step by Step
1. Prepare the Stone
Soak water stones for ten minutes, or until bubbles stop. Oil stones need a light film of oil. Set the stone on a damp cloth so it cannot slide.
2. Mark the Bevel
Colour the existing bevel with a marker. It costs nothing and removes all guesswork about your angle.
3. Set the Angle and Take Two Passes
Check where the marker was removed and adjust before committing.
4. Grind One Side Until a Burr Forms
Work in sections: heel, middle, tip. Moderate pressure on the coarse stone, moving the edge into the stone as though shaving a thin layer off it. Check for the burr every twenty strokes or so.
5. Flip and Repeat
Same count, same angle, until the burr flips to the other side.
6. Move Up a Grit
Repeat on the finer stone with lighter pressure. The goal now is removing the previous stone’s scratches, not removing metal.
7. Alternate Light Passes
Single strokes each side, progressively lighter, to break the burr down.
8. Strop
Ten to twenty passes each side on leather, spine leading, to remove what is left of the burr.
9. Test
Paper, then tomato. If either fails, you almost certainly left burr on the blade.
The one rule to remember: raise a burr along the full length on one side, flip it to the other side, then remove it. Everything else is refinement. If you are not getting a burr, you are not sharpening.
Working Through the Grits
What Each Grit Is For
Coarse stones, 220 to 1000, repair damage and reset geometry. Medium, 1000 to 4000, does the actual sharpening. Fine, 6000 and up, refines the scratch pattern.
Why You Progress
Each grit removes the scratches left by the one before. Skipping from coarse to very fine leaves deep scratches the fine stone cannot remove, and the apex stays ragged.
When to Stop
Depends what you cut. Rope, cardboard and fibrous material perform better off a medium stone, because a slightly toothy edge bites into fibre. Meat, vegetables and push cuts want the polished finish.
How Long Each Stage Takes
Most of the time goes on the first stone raising the first burr. Once that exists, each subsequent grit takes a fraction as long.
Stropping and Finishing
What Stropping Does
Removes the last of the burr and aligns the apex. It is not sharpening and cannot rescue a dull knife.
Technique
Spine leading, always. Dragging the edge into the leather rolls the apex over and undoes the work. Light pressure, ten to twenty passes each side.
Compound or Bare Leather
Bare leather aligns. A light chromium oxide compound also cuts very slightly and produces a keener finish. Either works; compound is faster.
Stropping Between Sharpenings
Thirty seconds of stropping once a week keeps a kitchen knife noticeably keener and delays real sharpening for months.
Sharpening Safely
The technique itself is low risk, and the injuries that do happen follow a pattern. Set the stone on a damp cloth so it cannot slide. Keep the hand that steadies the blade behind the edge, never in front of it, and never wipe swarf off the stone with the blade in your other hand. Wipe the blade spine-first on a cloth, exactly as you would strop.
The genuinely dangerous moment comes after: a freshly sharpened knife cuts far more readily than the dull one you had five minutes ago, and habits calibrated to a blunt blade are suddenly wrong. Slow down on the first few cuts after sharpening, particularly with a knife that was very dull beforehand.
Checking Your Work
Run the Tests Again
Paper first, then tomato. Both should now pass with no pressure at all.
Check the Whole Edge
Test at the heel, the middle and the tip separately. A common outcome for beginners is a sharp middle and a dull tip, because the wrist drops as the stroke reaches the curve.
Look for Light Again
Under a bright light the apex should be invisible along its whole length.
If It Still Fails
Almost always one of three things: you never raised a burr, you left burr on the edge, or your angle wandered. Go back to the medium stone and start again.
Field Sharpening With What You Have
Away from a bench the requirements change. A small double-sided diamond plate weighs under a hundred grams and will restore a working edge on a hunting knife in a few minutes. A ceramic rod does the same job more slowly and is harder to damage.
If you have neither, the unglazed base ring of a ceramic mug is a genuinely usable medium-grit abrasive, and a smooth river stone will do coarse work in an emergency. None of this produces a refined edge, but a working edge in the field beats a perfect edge at home, and a knife that cuts is safer than one you have to force. Wet the surface, keep the angle consistent, and finish with a few passes stropped on your belt.
Mistakes That Keep Knives Dull
Stopping Before the Burr
The single most common failure. Without a burr the bevels never met.
Too Much Pressure on Fine Stones
Fine grits refine; they do not remove metal. Heavy pressure just creates a new burr you then have to remove.
Letting the Angle Wander
Produces a convex, rounded apex that feels sharp on the shoulder and cuts nothing.
Sharpening on a Dished Stone
A hollowed stone puts a curve into a straight edge. Flatten stones regularly.
Stropping Edge-First
Rolls the apex over and ruins the edge you just made.
Using a Pull-Through on a Good Knife
Removes years of blade life in a few seconds. If a knife is worth sharpening, it is worth sharpening properly, which our guide on where to spend your money on knives argues at length.
| Symptom | Most likely cause | Fix |
|---|---|---|
| No burr forms after many strokes | Angle too high, riding on the shoulder | Lower the angle; mark the bevel and check |
| Sharp in the middle, dull at the tip | Wrist dropping through the curve | Lift the handle as you reach the belly |
| Feels sharp then dulls within minutes | Burr left on the edge | Alternate light passes, then strop |
| Edge chips in use | Angle too acute for the task | Reprofile 2-3 degrees more obtuse |
| Cuts paper but not tomato | Apex rounded, not truly apexed | Return to the medium stone, raise a fresh burr |
| Stone stops cutting | Glazed or dished | Flatten the stone; check steel hardness |
| Scratches will not refine out | Skipped a grit | Go back one grit and work longer |
Serrated, Recurve, Damascus and Tanto
Serrated Edges
Sharpen each scallop individually with a tapered ceramic rod, working only from the bevelled side. The flat side gets a single light pass at the end to remove burr.
Recurve Blades
The concave section cannot be reached by a flat stone. Use a round rod or a slipstone.
Damascus
Sharpen exactly like any other carbon steel. The pattern runs through the full thickness of the blade, so sharpening never removes it, as explained in our Damascus versus high carbon guide. Ours is 1095 and 15N20 at HRC 58 to 60 and responds well to ordinary stones.
Tanto Profiles
Two distinct edge sections meeting at an angle. Sharpen each as though it were its own small blade.
Very Hard Steels
Above about HRC 61, or with high vanadium content, use diamond plates. Ordinary stones will glaze and stop cutting.
When to Hand It to Someone Else
Two situations justify professional sharpening. The first is serious damage: a deep chip, a broken tip, or an edge that has been reprofiled badly enough that fixing it means removing a lot of steel. That work goes faster on a belt grinder in trained hands, and doing it freehand can take hours.
The second is a knife you are not willing to practise on, such as an inherited or expensive blade. Learn on something cheap first. What you should not do is send out a knife that simply needs a routine sharpening, because that is the work you will do best yourself and the skill only develops through repetition.
How Often to Sharpen
Sharpen by Performance, Not by Calendar
Test the knife. If honing restores it, hone. If not, sharpen. Sharpening on a schedule wastes steel.
Typical Intervals
A home kitchen knife honed weekly needs sharpening two to four times a year. A professional line cook may sharpen monthly. A hunting knife typically wants attention once per animal and a full sharpening at the end of the season.
What Shortens the Interval
Cardboard, rope, bone contact, glass and stone cutting boards, and dishwashers. Our knife care tips cover the habits that keep edges alive longest, and the right knife for the task dulls far more slowly than the wrong one.
Frequently Asked Questions
How do I know when my knife needs sharpening?
Slice a held sheet of paper. A sharp knife glides through cleanly; a dull one tears or slips off. Then try laying the edge on a tomato with no pressure. If it skids instead of starting the cut, it needs attention. Try honing first, because most knives that feel dull are only misaligned.
What is a burr and why does it matter?
A burr is a thin wire of steel that folds over to the far side of the edge when a bevel finally reaches the apex. It is the only reliable proof that you have ground far enough. If you are not raising a burr along the full length, you are polishing the shoulder of a dull edge rather than sharpening it.
What angle should I sharpen my knife at?
Kitchen knives 15 to 18 degrees per side, everyday carry 18 to 20, hunting knives 20 to 22, and camp or chopping blades 22 to 25. Consistency matters more than the exact figure: a steady 19 degrees beats an angle wandering between 15 and 25.
Are pull-through sharpeners bad for knives?
They remove a great deal of steel very quickly and leave a coarse, short-lived edge. For a knife you do not care about they are acceptable. On a knife you value they take years off the blade to save a few minutes.
Can I sharpen a Damascus knife normally?
Yes. Use the same stones, angles and grit progression as any carbon steel blade. The layered pattern runs through the entire thickness of the steel, so sharpening never removes it.
Why is my knife still not sharp after sharpening?
Almost always one of three things: you never raised a burr, so the bevels never met; you left the burr on the blade, so it tore off in use; or your angle wandered and rounded the apex. Return to the medium stone and work until a burr runs the full length.
Maintaining the Stones Themselves
Stones need looking after too, and a neglected stone quietly ruins results. Water stones dish in the middle with use, and a hollowed stone puts a curve into an edge you are trying to keep straight. Check flatness by drawing a pencil grid on the surface and lapping until the grid disappears evenly.
Oil stones and diamond plates glaze instead, clogging with steel particles until they stop cutting. A scrub with soapy water and a stiff brush restores them. If a stone suddenly seems to have stopped working, it is almost always glazed rather than worn out, and people replace far more stones than they need to. Handle and sheath care is covered in our knife materials guide.
The Twenty Minutes That Changes Everything
Sharpening looks like a craft and behaves like a procedure. Grind one bevel until a burr appears along the whole edge. Flip it. Remove it. Refine. Everything written above is elaboration on those four steps, and once the burr makes sense the rest follows quickly.
Buy a combination stone and a strop, practise on a knife you do not mind marking, and give it ten sessions. After that you will never again own a dull knife, and you will stop buying gadgets that promise to do this for you badly.
Our blades are 1095 and Damascus at HRC 58 to 60, chosen partly because they respond quickly to an ordinary stone and reward exactly this kind of maintenance. Browse the HM Knives collection if you want a blade built to be sharpened rather than replaced, or contact us if you are not sure which stones suit the knives you already own.
From Our Workshop
Blades from our range, and how each behaves on a stone. Prices are on each listing.
- Full Tang Skinner Knife — J2 Steel with Sheep Horn Handle — J2 full tang skinner — plain carbon steel raises a burr cleanly and releases it readily, which makes it pleasant to learn on.
- 13 Inch Bowie Knife — Damascus Steel, Bone and Bull Horn Handle — Damascus — sharpens exactly like any carbon steel; the layers change nothing about the process.
- D2 Skinning Knife — Full Tang with Bone Handle — D2 — the exception. Its chromium carbides resist an ordinary aluminium oxide stone, so this one wants a diamond plate.
Browse the full range.
All the prices are mentioned on the particular product/products. If you are interested in custom or wholesale orders, please let us know. Thank You.